5 Easy Ways to Download Videos on IG, Using Apps or Directly Through Browsers
Not everyone knows how to download videos on IG. By following these methods, you can save your favorite IG videos directly on your mobile phone or PC.

Kapanlagi.com - Every laptop or computer device is equipped with various advanced features. One of them is using the screenshot feature on a laptop. Although different from smartphones, the way to take screenshots on a laptop has steps that are equally easy and simple.
For digital device users, the term screenshot is quite familiar. Yes, a screenshot is a way to capture the screen on smartphones, laptops, or computers. With a screenshot, users can save the screen capture on their device in the form of a photo or image.
The way to take screenshots on a laptop can be done using the built-in laptop feature or with additional applications. But don't worry, because the way to take screenshots on a laptop, whether using applications or without applications, is quite easy, simple, and fast.
Some ways to take screenshots on a laptop can even be done in just two steps. So it can support your work more efficiently. Here is a complete review of how to take screenshots on a laptop quickly and simply with only two steps, as summarized by kapanlagi.com from various sources.
(credit: unsplash.com)
The first way to take a screenshot on a laptop is by using the print screen button. As the name suggests, the print screen button is used to capture a screenshot on a laptop and save it as an image. The screenshot button on a laptop is located on the top right of the keyboard with the label PrstSc. Using the print screen button alone will capture the entire page you take.
Just as easy as taking a screenshot on a smartphone, taking a screenshot on a laptop using the print screen button is very simple to practice. Here are some steps to take a screenshot on a laptop using the print screen button.
- First, prepare the page you want to screenshot on your laptop screen.
- Then, press the PrstSc button on your laptop keyboard. Don't worry if nothing happens, because automatically your laptop screen page has been successfully captured.
- To view the result, the next step is to open the paint application and paste by pressing Ctrl + V.
- After that, you will see the captured screenshot on your laptop screen, edit it according to your needs, such as cropping. Then, save it by selecting file and save As. Automatically, the screenshot result on the laptop screen will be converted to an image format, which is JPEG.

(credit: unsplash.com)
Instead of just using the print screen button, this time you can take a screen shot on a laptop by simultaneously pressing the Alt and PrstSc buttons. However, taking a screen shot on a laptop using this method will produce different results compared to using only the print screen button. You will only see the captured screen on the active page.
This means that if the page you have open is the Google homepage, then when you take a screenshot, only that part will be captured on the laptop screen. Here is how to take a simple screen shot on a laptop using the Alt + PrstSc buttons.
- First, prepare the page you want to take a screenshot of on your laptop screen.
- Then, press Alt + PrstSc simultaneously, and you will have successfully taken a screenshot on your laptop. To view the result, open the Paint application.
- After opening the Paint application, press Ctrl + V. The result will be displayed, and you don't need to edit it anymore.
- Save the screenshot as an image file.

(credit: unsplash.com)
The next way to take a screenshot on a laptop is by using the Windows key on the keyboard along with the print screen button. Taking a screenshot on a laptop using this method is also very easy to practice. The captured screen result using this method will be displayed in its entirety.
However, you no longer need image editing applications like paint to view the results. It will be automatically saved in the pictures document on your laptop. The steps to take a screenshot on a laptop using the Windows key and print screen button can be seen in the following explanation.
- First, open the screen page you want to screenshot.
- Then, press the Windows key + print screen button simultaneously.
- Automatically, the captured screen result will be saved in the pictures document of your laptop's storage media. To view it, you can open the pictures in the file explorer on your laptop and select the screenshot.

(credit: unsplash.com)
The next way to take a screenshot on a laptop is by using the Windows and volume buttons. However, it is important to note that the volume button for taking a screenshot on a laptop is the volume down button. Meanwhile, for the screenshot result on a laptop using this method, you will get a full-screen result. Here is how to take a screenshot on a laptop easily.
- First, open the screen page that you want to screenshot.
- Then, press the Windows button together with the volume down button.
- Automatically, you have successfully taken a screenshot on your laptop. To view the result, you can open the picture in the file explorer and select the screenshot.

(credit: unsplash.com)
The next way to take a screenshot on a laptop is by using the snipping tool. The snipping tool is usually included as a built-in application on a laptop, making it easier for you to use it for taking screenshots on your laptop. Here is how to quickly take a screenshot using the snipping tool.
- First, open the screen page on your laptop that you want to screenshot.
- Then, open the snipping tool and choose the mode you want, whether it is capturing the entire screen or just a specific part of the screen.
- Move your mouse cursor according to the part of the screen you want to screenshot.
- After that, you can automatically see the result on the snipping tool page. If it is satisfactory, save the screenshot file.
(credit: unsplash.com)
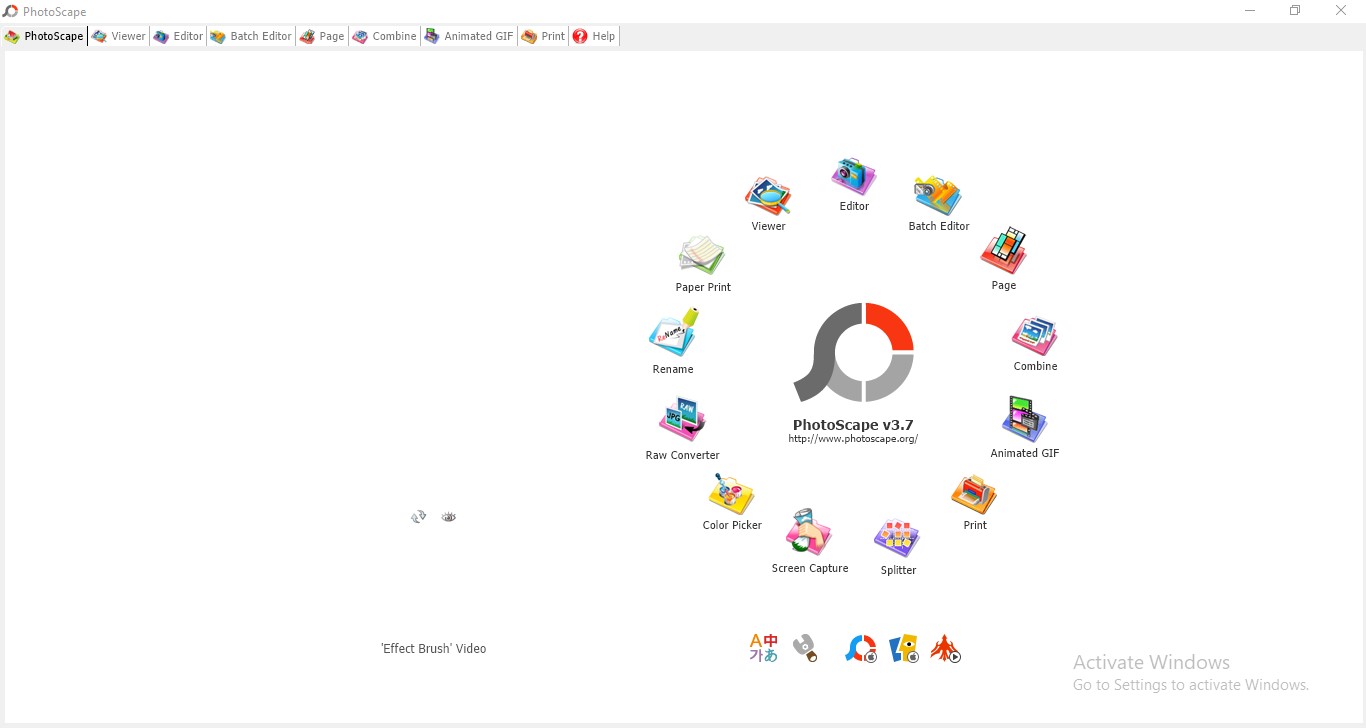
The PhotoScape application can also be used to take screenshots on a laptop. Taking screenshots on a laptop using the PhotoScape application is just as easy and simple. However, make sure you have installed the PhotoScape application on your laptop to take advantage of this screen capture feature KLovers.
There are several options for taking screenshots on a laptop using the PhotoScape application. Whether it's a full-screen screenshot or not, you can adjust it according to your needs. Here's how to take screenshots on a laptop using the PhotoScape application.
- First, open the screen page on the laptop that you want to take a screenshot of.
- Open the PhotoScape application, then select screen capture and adjust the mode option you want.
- Then click on the selected mode option, the result will automatically appear on the PhotoScape application.
- Next, you can edit it according to your wishes and needs. Save the file as an image.
Those are some 6 quick and easy ways to take screenshots on a laptop, it can even be very simple with just two steps. You can easily practice the above laptop screenshot methods according to your needs.
Source: brilio.net, merdeka.com
(kpl/gen/nlw)
Cobain For You Page (FYP) Yang kamu suka ada di sini,
lihat isinya
Not everyone knows how to download videos on IG. By following these methods, you can save your favorite IG videos directly on your mobile phone or PC.

Not only for paying phone and SMS services, you can also use credit to buy internet packages. Imagine, you don't have an internet connection, but the situation forces you to keep working using it. Having knowledge about how to transfer Indosat credit is important.

Axis is a cellular service in Indonesia that provides many services. And here's how to register an Axis card for new customers and for those of you who are existing customers. Let's check it out, KLovers.

Each provider card has its own procedure for registration. Each provider card has its own procedure for registration.

Just like registration for other things, there are specific steps that must be taken to register a Telkomsel card. Just like registration for other things, there are specific steps that must be taken to register a Telkomsel card.

If you want to reshare your own TikTok creation videos without including a watermark, you can try several methods below. Without further ado, let's check out several ways to download TikTok videos without watermark that have been gathered from various sources below.

Although considered valid in terms of religion, nikah siri, which seems to take place in secrecy, has many negative impacts. In addition to not complying with state regulations, such marriages are also vulnerable to harming family members. Unfortunately, because they lack legality, they have difficulty filing claims.
There are many reasons why someone has to change their number. Either because of needs, lost cards, damaged, or even dead. Well, if you experience these obstacles, please read the following procedure for unregis Telkomsel card before registering a new card as a replacement.
Regardless of the advanced features of WhatsApp, you must have heard of how to spy on WhatsApp. Spying on WhatsApp is usually done by someone to find out their partner's honesty. This is a very easy way to spy on WhatsApp.

When you have urgent needs, you can ask your relatives or friends to transfer credit, and vice versa. Therefore, it is important for you to know how to transfer Telkomsel credit along with the terms and conditions as follows.

Jackson Wang shares the secrets behind his glowing skin. Turns out, the GOT7 leader has a skincare routine before bed that KLovers can definitely try.

Checking credit occasionally is also important to prevent the number from expiring during the grace period. Here are several easy ways to check Telkomsel credit.